Easter Egg Roving

Tuesday afternoon, the Easter egg dyes (we use food coloring) were out around here (not for the hard boiled eggs yet, but for some wooden ones and some shells), and I decided it was about time to try dyeing roving with the leftovers. I shared some process photos yesterday, but I wanted to share a sort of tutorial about it, because it was a cheap, fairly easy, way to dye fiber.
Before we begin, though, let’s talk about safety. Knitty magazine has talked about dyeing a couple times, and Spin Off also regularly runs features on it. (Both definitely have more than I linked here. I’m lazy). All of those articles say the same thing: work outside or in a well ventilated area, don’t inhale the powdered dyes, wash your hands a lot, and so on. Because we’re using food coloring and Easter egg dyes, only some of those apply — there’s no powder to inhale, and while you should still wash your hands, the worst that will happen is a persistent stain.
You want to make sure that your area is well lit, and preferably that you have access to a sink and a way of boiling water. Ventilation is good, but only really necessary to the extent that you’d need it for cooking. I did this on my kitchen table, walking distance from the sink and the electric kettle.
Warning: dye is permanent!! Do not wear nice clothing because it will stain!
Materials

- For the dyes:
- Food coloring: I used the little 4-packs that you can buy at the store. As a bonus, they usually have recipes for more colors on the back. Gel colorings don’t work so well, since they don’t dissolve in water as easily, so get the liquid kind if you can (I did use one gel in my color choices, to get another purple, but it was harder to use and took lots of stirring).
- Vinegar: this is the mordant and makes the dye stick to the fibers (or the Easter eggs). You don’t want a fancy kind for this; I like just plain white vinegar.
- Water. You’ll need to boil it, but you also want a source of cold running water and warm running water. I used my kitchen sink and an electric kettle.
- Cups to hold the dye, measuring cups and spoons, and a stirring stick: Easter egg dye cups work well, but jars would be fine. Make sure they’re heat safe! I use a chopstick to stir, but don’t use one that can’t be stained!
- Roving or yarn: you want animal fibers, as plant fibers like cotton don’t absorb acid dyes (food coloring is an acid dye, even though it’s not a commercial one). I used white wool roving and a short bit of handspun made from some of the roving.
- Paper towels: while you could use reusable cloths, and I advocate that, it’s going to end up covered in permanent dye and such, so I use paper towels.
- Plastic wrap: to cover the cups overnight.
- Plastic bags and a big tub: to soak the wool in. You do need both!
- A space to leave the cups overnight.
- Optional: gloves, trays to put the cups on (if you’ll need to move them once the dye is in), and an apron.
How to do it
- Make sure you have all your materials. Then, we’ll prep the wool. Lay out your wool in the amounts you want, by weight or by length, and put each into a plastic bag. Bring your plastic bags to a sink, and open one up. You’ll want your plastic tub nearby. Turn the sink to cold, and fill the bag just enough to cover the roving. Make the roving as wet as it can get, then turn the temperature to the medium temperature and fill it with about the same amount of warm water. If your bags are small, at this point they may be too full to add more water; in this case, pour the water into whatever you’ll be heating dye water in and use it for the boiling water. Fill the bag the rest of the way with hot water, trying not to agitate the wool. Wool needs 3 things to felt: moisture, heat, and agitation. You can’t avoid 2 of them while dyeing, so try to avoid agitation or it’ll felt and be useless. Close the bag and put it gently into the plastic tub. Repeat this for all your pieces of wool, and then leave the tub in the sink. You’ll use the tub to carry them around.

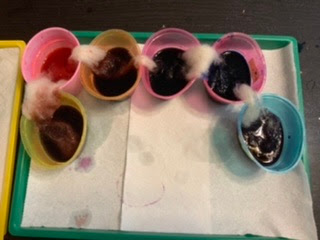
- Now we can prep the dyes. Get your dye cups, and add a teaspoon of vinegar to each. Pour a half cup of boiling water into each cup, and then add your dyes according to the recipes. Each cup should have about 20 drops of food coloring, and there are usually recipes on the back of the box. Stir with a stirring stick (try to go from lightest color to darkest color) and set out in the order you want to dye each portion of fiber. You’re going to use multiple cups for each roving, so make lots. I used 6 dye cups for my larger roving, 4 for my smaller one, and 3 for the yarn. Set them out in a space where you can leave them overnight, on top of paper towels just in case.
- Put the wool in the cups, making sure that you get enough in that it sinks into the cup and gets covered in dye. Obviously, you’ll probably wish to take the wool out of the bag first — you can rinse and reuse the bags for other things. Open the bag over the plastic tub, so when the water spills you can catch it and use it for other things. Push the wool down so it can really soak in the dye, but try not to agitate it too much!
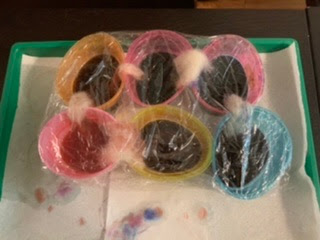
- Cover the cups with plastic wrap, and leave them overnight. About 2-3 hours in, you may want to boil a cup of water and add 2 teaspoons of vinegar, then pour a little more into each cup; this just makes sure that the dye sticks to the fiber, and you want to cover them again afterwards. You really want to have paper towels nearby for this because spilling is common.
- In the morning, peel the plastic wrap off and take the roving out. You’ll want to work one portion at a time. Run the wool under cold water until the water comes out clear and un dyed, then dump the dye out and rinse the cups. All the components of the dye can go down the drain, but you do want to make sure that your drain can take the vinegar (I learned by experience a very long time ago that soap and vinegar do not mix well). Pat the wool dry with a paper towel (again, try not to agitate it, just in case), and leave it in a dry place (sunlight will bleach it, so keep it out of the direct sun) until it is fully dry. Not “sort of dry”, not even “dry”, but actually dry. You can’t work with it until it’s dry enough that no part of it feels wet to the touch. This might take all day; mine took about 8 hours, but it still wasn’t a hundred percent dry (maybe only 99% dry). I put it away at that point, even though it wasn’t perfect, because I’m a lazy person, but I don’t recommend it.
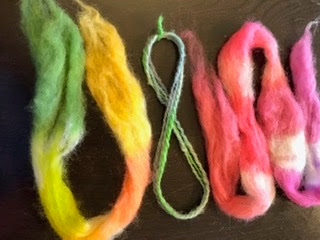
- Clean up your space, put materials away, and go spin the roving and craft with the yarn. Have fun! Go wild! Combine colors!


Comments